Rotator Cuff Tear vs. Frozen Shoulder: A Doctor’s Guide to Spotting the Difference

Rotator Cuff Tear vs. Frozen Shoulder | Dr. Manu Mengi

Rotator Cuff Tear vs. Frozen Shoulder confusion is something I encounter frequently in my practice, with many patients mistakenly self-diagnosing their shoulder pain. These two conditions are often confused with each other, yet they present distinct symptoms and have significantly different recovery timelines.

In my experience, understanding the key differences can help you identify your condition more accurately. Rotator cuff tears typically have a sudden onset, particularly after activities like lifting something heavy or falling. At the same time, frozen shoulder develops gradually with pain that slowly worsens over weeks or months. The most telling difference? If you have a rotator cuff tear, you can likely lift your shoulder without assistance. However, with a frozen shoulder, you’ll face difficulty raising your arm by yourself.

Throughout this guide, I’ll walk you through the specific symptoms, causes, and treatments for both conditions. We’ll explore why frozen shoulder involves progressive stiffness accompanied by dull, aching pain (especially at night), while rotator cuff tears cause sharper, more localised pain when lifting or rotating the arm. By the end, you’ll understand why that stiffness in your shoulder joint might indicate one condition over the other.

This self-diagnosis often leads to anxiety. If you're in Mohali and struggling with shoulder pain, the most important step is to get a professional evaluation. Book an appointment with a specialist to get an accurate diagnosis and peace of mind.

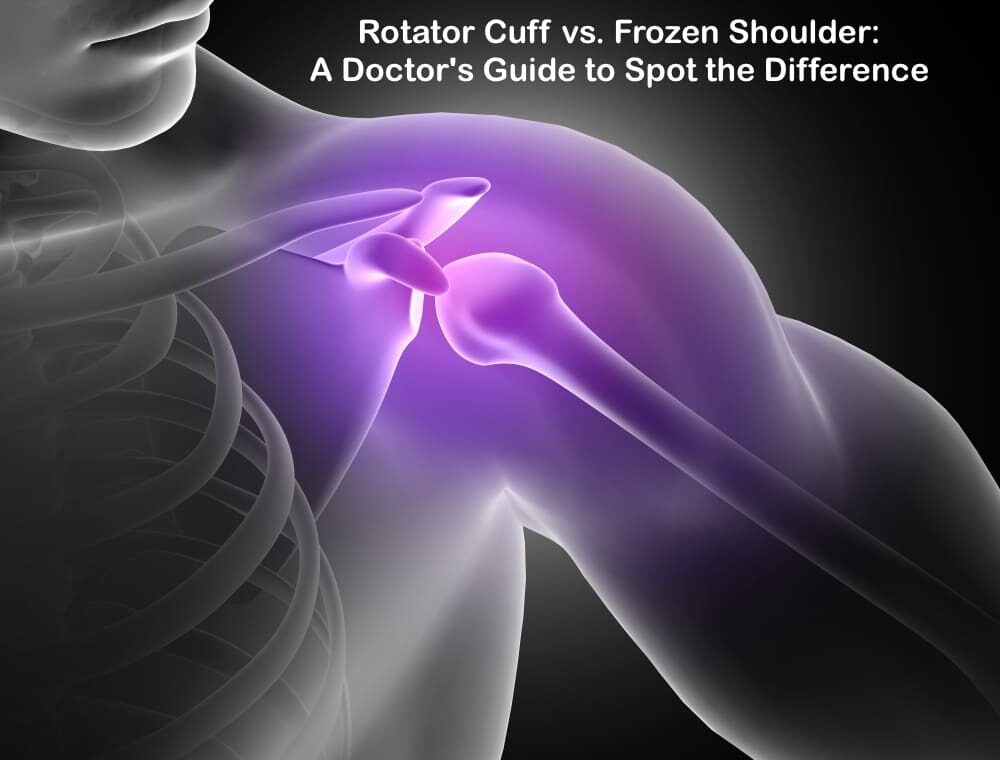
Understanding the Shoulder: Anatomy and Function

The shoulder represents one of the most complex and mobile joints in the human body. To fully understand the differences between rotator cuff injuries and frozen shoulder, we must first examine the intricate architecture that allows for this remarkable range of motion. Unlike other joints that prioritise stability, the shoulder sacrifices some stability for mobility, making it uniquely susceptible to certain conditions.

The role of the rotator cuff in shoulder movement

The rotator cuff forms the cornerstone of shoulder function – a group of four muscles and their tendons that surround the shoulder joint like a protective collar. This muscular quartet connects your shoulder blade (scapula) to your upper arm bone (humerus) and works together to enable precise movement while maintaining joint stability.

The four muscles that make up this critical structure include:

  • Supraspinatus: Initiates the first 15 degrees of arm abduction (lifting your arm away from your body)
  • Infraspinatus: Powers external rotation of the arm away from your body
  • Teres minor: Assists with external rotation and stabilisation
  • Subscapularis: Enables internal rotation (turning your arm toward your body)

A helpful mnemonic for remembering these muscles is “SITS” – Supraspinatus, Infraspinatus, Teres minor, and Subscapularis.

The primary biomechanical role of these muscles extends beyond their movement function. They compress the head of the humerus against the shallow glenoid cavity of the scapula, creating what doctors call “dynamic stability”. Without this muscular support, the disproportionate size between the humeral head and the glenoid fossa (a 4:1 surface area ratio) would make the joint highly unstable.

Furthermore, these muscles don’t work in isolation. For example, during abduction, the supraspinatus handles the initial 0-15 degrees of movement, then the deltoid muscle takes over from 15-90 degrees. Finally, the scapula must rotate to achieve full range of motion, which is accomplished by the trapezius and serratus anterior muscles.

What is the shoulder capsule, and why does it matter

Surrounding the glenohumeral joint is a fibrous sheath called the shoulder capsule. This structure extends from the anatomical neck of the humerus to the rim of the glenoid fossa, completely enveloping the joint. Unlike other joint capsules in your body, the shoulder capsule has a unique characteristic – it’s remarkably loose and lax, allowing the bones to separate by more than 2.5 cm.

This laxity isn’t a design flaw but rather a deliberate feature that permits the extensive freedom of movement characteristic of the shoulder joint. Nevertheless, this same feature also makes the joint more vulnerable to instability and injury.

The capsule doesn’t work alone in providing joint stability. It’s reinforced by:

  • The glenoid labrum – a fibrocartilaginous ring that deepens the glenoid cavity
  • Ligaments that connect bones to bones
  • Tendons that connect muscles to bones
  • The rotator cuff muscles themselves, which fuse with the capsule

Additionally, fluid-filled sacs called bursae surround the capsule, facilitating smooth movement by reducing friction between the structures. The synovial membrane inside the capsule produces lubricating fluid that further aids motion.

Interestingly, when the shoulder capsule becomes damaged or inflamed, it can lead to adhesive capsulitis – commonly known as frozen shoulder. In this condition, the capsule thickens and becomes stiff, significantly restricting movement and causing pain.

How shoulder mobility is affected by injuries

Given the complexity of the shoulder’s structure, it’s not surprising that injuries can substantially impact its function. Shoulder pain affects approximately 18 million Americans each year, with rotator cuff tears accounting for a significant number of these cases.

Rotator cuff tears can occur through trauma, overuse, or age-related degeneration. These tears affect one in every four adults aged 60 years and older, with the supraspinatus tendon being most commonly involved. Risk factors include smoking, high cholesterol, and family history.

When the rotator cuff is damaged, patients typically experience:

  • Pain during overhead activities
  • Limited range of motion
  • Weakness in the shoulder
  • Difficulty with daily activities

Studies using three-dimensional motion analysis have shown that individuals with symptomatic rotator cuff tears exhibit abnormal shoulder motion when performing common daily tasks compared to those without tears. This dysfunction occurs because rotator cuff injuries compromise the joint’s dynamic stability, creating muscle force imbalances.

Alternatively, when the shoulder capsule becomes inflamed and thickened in adhesive capsulitis (also known as frozen shoulder), patients experience progressive stiffness and significant pain. This condition not only limits one movement but can also restrict motion in multiple directions simultaneously.

Research shows that patients with rotator cuff-related shoulder pain demonstrate significantly less shoulder flexion, internal and external rotation range of motion compared to individuals without shoulder problems. This finding helps explain why these conditions have such a profound impact on everyday activities.

Both conditions can make simple tasks challenging – whether reaching for objects on high shelves, putting on a coat, or even combing your hair. Understanding the underlying anatomy helps explain why these different conditions can sometimes present with similar symptoms despite having distinct causes.

As we've seen, both conditions severely impact your daily life. The key to effective treatment is a correct diagnosis. If you're experiencing limited motion or pain, consider visiting a 
Specialised Shoulder Clinic in Mohali for a comprehensive assessment.

Rotator Cuff Tear: Causes, Symptoms, and Diagnosis

Rotator cuff tears represent one of the most common shoulder injuries I diagnose in my practice. These tears are the leading cause of shoulder pain and shoulder-related disability, affecting millions of people each year. In fact, more than 2 million Americans experience some rotator cuff problem annually. While these injuries can affect people of all ages, they’re particularly common in adults over 40, with prevalence increasing significantly with age.

As a physician, I find that many patients are surprised to learn that some individuals have rotator cuff tears without experiencing any symptoms whatsoever. This silent presentation can make diagnosis challenging in certain cases.

Common causes: trauma, overuse, and ageing

Rotator cuff tears typically fall into two distinct categories: acute traumatic tears and degenerative tears. Understanding this distinction is crucial for proper treatment.

Traumatic (Acute) Tears occur suddenly as a result of a specific injury. In my experience, patients often report:

  • Falling on an outstretched arm
  • Lifting something heavy with a jerking motion
  • Experiencing sudden force while pushing or pulling
  • Sustaining an injury during a shoulder dislocation

These traumatic tears account for approximately 8% of all rotator cuff injuries. They tend to stem from higher energy mechanisms and typically cause full-thickness tears, whereas degenerative tears often begin as partial-thickness injuries. Moreover, traumatic tears generally are larger and more likely to involve the subscapularis muscle.

Degenerative (Wear-Related) Tears develop gradually over time due to natural ageing processes. These constitute the majority of rotator cuff injuries I see in my practice. Several factors contribute to these tears:

  1. Repetitive stress – Certain activities that involve repeated shoulder motions put significant strain on the rotator cuff. Sports like baseball, tennis, rowing, and weightlifting carry an increased risk of overuse. Likewise, many occupations requiring repetitive overhead movements can lead to progressive damage.
  2. Decreased blood supply – As we age, blood flow to our rotator cuff tendons diminishes. Without adequate blood supply, the body’s natural ability to repair tendon damage becomes impaired, ultimately leading to tissue breakdown.
  3. Bone spurs, also known as age-related bone overgrowth (osteophytes), can develop on the acromion, creating friction against the rotator cuff tendons when you move your arm.

Essentially, the supraspinatus tendon bears the brunt of most rotator cuff injuries, as it endures the majority of shoulder-stabilising strain. Approximately 53% of patients with supraspinatus tears also have involvement of the infraspinatus.

Concerning symptoms, patients typically experience:

  • Pain localised to the anterior shoulder or greater tuberosity area
  • Discomfort when lying on the affected shoulder
  • Pain with overhead activities
  • Night pain that interrupts sleep
  • Weakness in the affected arm
  • Crackling or popping sensations during certain movements
  • A positive painful arc sign during clinical examination

Diagnosing rotator cuff tears involves several components. First, I take a detailed history, including the mechanism of injury and activities that aggravate or relieve symptoms. Next, I perform a thorough physical examination, checking for tenderness, range of motion, and specific clinical tests designed to stress the rotator cuff tendons. Additionally, diagnostic imaging plays a crucial role in confirming the diagnosis and determining the extent.

Specifically, when patients present with an inability to elevate their arm after a traumatic event, despite normal radiographs, I maintain a high index of suspicion for rotator cuff pathology, as these injuries can often be missed during initial assessment.

While this guide helps you understand the differences, only a physical examination can confirm your condition. For expert rotator cuff tear treatment in Mohali or frozen shoulder treatment in Mohali, seeking help from a qualified orthopaedic doctor is crucial. Learn more about your Shoulder Pain Treatment Options in Mohali.

Key Takeaways

Understanding the differences between rotator cuff tears and frozen shoulder can help you identify your condition and seek appropriate treatment more effectively.

• Onset patterns differ significantly: Rotator cuff tears typically occur suddenly after trauma or lifting, while frozen shoulder develops gradually over weeks to months with progressively worsening pain.

• Movement ability is the key differentiator: With rotator cuff tears, you can usually lift your arm without assistance, but frozen shoulder severely limits your ability to raise your arm independently.

• Pain characteristics vary between conditions: Rotator cuff tears cause sharp, localised pain during lifting or rotation, while frozen shoulder presents as dull, aching pain that’s particularly troublesome at night.

• Age and activity patterns matter for diagnosis: Rotator cuff tears affect over 25% of adults aged 60+, often from repetitive overhead activities or sudden trauma. At the same time, a frozen shoulder involves inflammation and stiffness of the capsule.

• The rotator cuff’s four muscles (SITS) – Supraspinatus, Infraspinatus, Teres minor, and Subscapularis – work together to provide dynamic shoulder stability, making tears particularly disabling for daily activities.

Both conditions significantly impact quality of life; however, accurate identification of symptoms, such as pain location, movement limitations, and onset patterns, enables more targeted treatment approaches and better outcomes.

FAQs

Q1. How can I differentiate between a frozen shoulder and a rotator cuff tear?

A1. The key difference lies in your ability to move your arm. If you can lift your arm independently, it’s more likely to be a rotator cuff tear. Frozen shoulder severely limits your ability to raise your arm without assistance. Additionally, rotator cuff tears often have a sudden onset, while frozen shoulder develops gradually over time.

Q2. Is it possible for a rotator cuff tear to be misdiagnosed as frozen shoulder?

A2. Yes, these conditions can be confused. Some partial rotator cuff tears may not cause pain and can mimic symptoms of a frozen shoulder. However, a thorough medical examination, including imaging tests, can help differentiate between the two conditions.

Q3. What are the most effective treatments for frozen shoulder?

A3. Most cases of frozen shoulder improve on their own within 12 to 18 months. For severe or persistent symptoms, treatments may include physical therapy, corticosteroid injections, and in some cases, surgery. Steroid injections can be particularly effective when administered early in the progression of the condition.

Q4. What other conditions can be mistaken for a rotator cuff tear?

A4. Several shoulder conditions can present similar symptoms to rotator cuff tears, including biceps tendinitis, shoulder impingement syndrome, labral tears, arthritis, bursitis, and tendinitis. Each of these conditions affects different parts of the shoulder structure but may cause similar pain or movement limitations.

Q5. How does age affect the likelihood of developing rotator cuff tears?

A5. The risk of developing a rotator cuff tear increases significantly with age. They are particularly common in adults over 40, with more than 25% of adults aged 60 and older experiencing some form of rotator cuff tear. This is often due to natural wear and tear, decreased blood supply to the tendons, and the development of bone spurs that can irritate the rotator cuff over time.

Still unsure about your shoulder pain? Don't let it limit your life any longer. If you're looking for an Affordable Shoulder Treatment in Mohali or simply want to consult with a trusted expert, reach out to us today. Schedule a consultation to get a clear diagnosis and start your journey to recovery.
📞 Call Us: +91 87250 11661 | 📍 Find Our Clinic: Google My Business

📖 Learn More About Shoulder Pain:

Dr. Manu Mengi – Shoulder Pain Specialist in Mohali

With extensive experience in diagnosing and treating complex shoulder conditions, Dr. Manu Mengi is a leading Shoulder Pain Specialist in the Mohali and Tricity region. He is dedicated to providing personalised care, utilising accurate diagnosis and evidence-based treatment plans to help patients regain pain-free movement and improve their quality of life.

The Hidden Link Between Your Sleeping Posture and Back Pain

Ever woken up with a tingling arm or an achy neck? Your sleeping posture & back pain might be more connected than you realise. Lower back pain is the leading cause of disability worldwide, with up to eight out of ten people experiencing at least one episode during their lifetime. If you’re struggling with persistent discomfort, consulting the Best Doctor for Back Pain Treatment in Mohali, Dr. Manu Mengi, can help diagnose and treat underlying issues effectively.

The relationship between sleep and pain works both ways. While back pain can make finding a comfortable sleeping position difficult, poor sleeping posture can cause or worsen your existing discomfort. Research clearly shows that there’s a significant correlation between pain and sleep quality. Consequently, making simple changes to your sleeping posture for back pain can lead to better spine alignment while sleeping and significantly reduce your discomfort.

Throughout this article, you’ll discover which positions support your spine and which ones might be contributing to your morning stiffness. Furthermore, you’ll learn practical tips for creating a sleep environment that helps alleviate back pain rather than causing it. Whether you’re dealing with chronic issues or occasional discomfort, understanding the hidden link between how you sleep and how you feel could be the key to waking up pain-free.

How sleep position affects your spine

Your spine is designed with specific natural curves that distribute weight and pressure throughout your body. During sleep, maintaining these curves becomes particularly important for preventing discomfort and injury.

Why spine alignment matters during sleep

The spine serves as the central support system for your body, protecting the spinal cord and helping distribute weight across muscles and bones. Good sleeping posture maintains these natural curves even while lying down. When your head, neck, or hips aren’t properly supported, the spine becomes misaligned, potentially leading to both immediate discomfort and long-term problems.

Misalignment during sleep puts uneven pressure on different parts of your spine. Sleeping on your back, for instance, places approximately 50 pounds of pressure on your spine. This pressure, when distributed unevenly due to poor posture, can cause muscle imbalances and strain that manifest as morning pain.

The role of gravity and pressure points

Gravity is a fundamental yet often overlooked factor affecting your sleep quality and spinal health. Research shows that gravitational forces continue to act on your body during sleep, influencing everything from muscle relaxation to breathing patterns.

Different sleeping positions interact with gravity in unique ways. When lying flat, gravity can cause soft tissues in your upper airway to relax and potentially obstruct breathing. Moreover, your mattress creates pressure points where your body makes the most contact with the surface.

A soft mattress allows the hips to sink too deeply, creating an unnatural spinal curve that may trigger lower back pain. Conversely, a mattress that’s too firm creates excessive pressure on contact points like shoulders and hips, potentially causing skin sores and muscle soreness.

Common signs your sleep posture is causing pain

Your body often signals when sleep posture is problematic. Watch for these warning signs:

  • Morning neck stiffness or soreness, especially if you sleep on your stomach with your head twisted
  • Waking with numbness or tingling in the arms or legs
  • Lower back pain that improves once you’ve been up and moving
  • Persistent shoulder pain on one side (usually the side you sleep on)
  • Headaches that begin shortly after waking

Sleep allows muscles surrounding the spine to fully relax through a process called muscle atonia. This relaxation is essential for recovery, but only works properly when your spine remains in neutral alignment throughout the night.

🔹 Struggling with chronic back pain? Visit the Best Back Pain Relief Clinics in Mohali for personalised treatment! Book an appointment now.

Best and worst sleep positions for back pain

Finding the right sleeping position can make a world of difference for your back. Each posture offers unique benefits and drawbacks depending on your specific condition.

Back sleeping: pros, cons, and pillow tips

Sleeping flat on your back is often considered the gold standard for spine health. This position distributes weight evenly across your body’s widest surface area, helping maintain the spine’s natural curve. Back sleeping keeps your head, neck and spine in a neutral position, reducing pressure that contributes to aches and pains.

To optimise this position, place a pillow underneath your knees. This simple adjustment helps reduce pressure on your lumbar spine. Additionally, using a thin pillow for your head prevents your neck from arching unnaturally.

Though ideal for spinal alignment, back sleeping isn’t perfect for everyone. This position may worsen snoring and sleep apnea as gravity causes the tongue or loose tissues in the throat to collapse and block the airway.

Side sleeping: how to do it right

Side sleeping ranks as the second-best position for avoiding back pain. This position helps keep your spine elongated and can significantly reduce pressure points along your back.

For optimal side sleeping, stretch your legs out straight rather than curling them. Place a firm pillow between your knees to maintain proper spinal alignment and prevent your top leg from pulling your spine out of position. Keep your ears aligned with your shoulders and your chin in a neutral position.

Fetal position: when it helps and when it hurts

The fetal position—lying on your side with knees drawn up toward your chest—is among the most popular sleeping positions despite its mixed benefits. This position can help open the space between your spinal vertebrae and reduce tension on your disks.

Nevertheless, curling too tightly can restrict movement and place excessive pressure on joints, particularly in the knees, hips, and spine. Over time, this may lead to stiffness or discomfort, especially without adequate mattress support.

Stomach sleeping: why it’s usually a bad idea

Stomach sleeping is generally considered the worst position for your spine. This position puts the most pressure on your spine’s muscles and joints because it flattens the natural curve of your spine. Additionally, it forces you to turn your neck to breathe, which can cause neck and upper back pain.

If you absolutely must sleep on your stomach, place a thin pillow under your pelvis and lower abdomen to reduce strain on your back.

Reclined sleeping: when it’s beneficial

For some people, particularly those with specific back conditions, reclined sleeping offers notable benefits. This position helps reduce pressure on your spine by creating an angle between your trunk and thighs.

Reclined positions can be especially helpful after surgery or for people with conditions like degenerative disk disease. The slightly elevated position also improves circulation and can reduce inflammation associated with back pain.

🔹 Looking for a Lower Back Pain Specialist in Mohali? Dr. Manu Mengi provides expert care tailored to your needs. Call +91 87250 11661 today!

How to improve your sleep setup

Creating an optimal sleep environment goes beyond just finding the right position. Your mattress, pillows, and supporting accessories play crucial roles in spinal health.

Choosing the right mattress for back pain relief

Medium-firm mattresses consistently show the most significant benefits for relieving back pain. According to research, 75% of orthopaedic surgeons recommend firmer surfaces for back pain sufferers. Memory foam and latex options provide excellent support by contouring to your body’s natural curves, distributing weight evenly and helping maintain proper spinal alignment. However, avoid mattresses that are too soft as they allow your body to sink excessively, causing your spine to curve unnaturally.

Pillow support for the lower back and neck

Proper pillow support can dramatically improve spine alignment. Lumbar support pillows placed beneath your lower back help maintain the natural curve of your spine. For neck support, cervical pillows with an S-shape design reduce pain by providing the perfect balance between softness and firmness. Side sleepers should use higher loft pillows to fill the gap between the shoulder and head, whereas back sleepers benefit from medium loft options. Interestingly, water pillows offer customizable support and pressure relief.

Using props like towels and body pillows

Simple household items can transform your sleep setup. Rolling up a towel or sheet and placing it where your lumbar area rests provides targeted support. For side sleepers, placing a pillow between your knees aligns your hips and reduces pressure on your lower back. Body pillows offer comprehensive support for side sleepers by simultaneously aligning the spine and reducing pressure on hips and shoulders.

Sleeping on the floor vs bed: does it help?

The evidence regarding floor-sleeping is primarily anecdotal. Some report back pain relief from firmer surfaces, yet scientific proof remains limited. The potential benefits include improved posture since softer surfaces allow your spine to curve while hard surfaces provide better support. Nevertheless, studies indicate medium-firm surfaces, not extremely firm ones, offer optimal pain relief.

Signs your mattress or pillow needs replacing

Replace your mattress every 6-8 years. Watch for visible indentations deeper than 1.5 inches, which indicate inadequate support. Other signs include waking with unexplained stiffness or pain, increased allergies from accumulated dust mites, and sleeping better elsewhere than in your bed. Your pillow needs replacing if it’s too thin, causing your head to rest lower than your chest.

🔹 Is your mattress worsening your back pain? Consult the Best Orthopedic Doctor in Mohali for Back Pain, Dr. Manu Mengi, for professional guidance.

Tips for long-term sleep posture correction

Correcting poor sleeping posture isn’t a one-night fix but requires consistent effort and proper techniques. Long-term improvement demands both behavioural changes and physical adjustments that train your body over time.

Stretching and mobility routines before bed

Gentle stretching before sleep can significantly improve the quality of your rest by relieving muscle tension that accumulates during the day. Consider your day like running a marathon—regardless of whether you’ve been walking, standing, or sitting, your muscles need relaxation to recover properly. Nighttime stretches for your neck, shoulders, and back help release tension and prevent muscle spasms that might wake you up. Ideally, perform these stretches 30-60 minutes before bedtime, not immediately before falling asleep.

Morning stiffness & sleep posture connection

Initially, many people dismiss morning back pain as “just part of ageing,” yet research reveals a direct link between sleep posture and waking discomfort. Studies show that people with cervical and lumbar pain spend approximately twice as long in provocative side-lying positions compared to those without pain. Furthermore, those experiencing spinal symptoms change sleep positions more frequently throughout the night. This correlation indicates that correcting sleep posture may effectively reduce morning stiffness.

How to sleep with scoliosis or herniated disks

For scoliosis patients, back sleeping typically offers the most relief as it helps maintain spine elongation without twisting. Alternatively, side sleeping with properly positioned pillows between knees and ankles can minimise asymmetrical tension. Those with herniated disks often find relief in the fetal position, which opens vertebral spaces and reduces pressure on disks. Sleeping in a reclined position creates a beneficial angle between your trunk and legs, allowing core muscles to rest.

Sleep advice for pregnancy-related back pain

Pregnant women experiencing back pain should avoid sleeping as it puts pressure on the aorta and vena cava. Instead, side sleeping with one or both knees bent provides optimal support. Place pillows between bent knees, under your abdomen, and behind your back. Consider using full-body pregnancy pillows specifically designed to support your changing body shape.

Training your body to adopt better positions

Changing sleep habits requires patience and consistency. The “tennis ball technique” effectively prevents rolling onto problematic positions—simply sew a tennis ball into your pyjamas to discourage certain positions. Electronic devices that vibrate when you roll into poor positions offer gentler feedback and better long-term compliance. Finally, gradually transition to new positions using strategic pillow placement, including supports under your knees for back sleeping or between your knees for side sleeping.

🔹 For expert Back Pain Treatment in Mohali, trust Dr. Manu Mengi’s proven methods. Schedule a visit today! Call +91 87250 11661.

Conclusion

The connection between your sleep position and back pain runs deeper than most people realise. Your nightly posture significantly impacts spinal health, potentially creating or relieving pain depending on your choices. Back sleeping generally offers the best support for your spine’s natural curves, while side sleeping with proper pillow support between your knees serves as an excellent alternative. Conversely, stomach sleeping typically causes more harm than good due to the unnatural neck twist and flattened spinal curve it creates.

Beyond position alone, your sleep setup plays a crucial role in back health. A medium-firm mattress paired with appropriate pillows creates the foundation for proper alignment throughout the night. Additionally, simple props like rolled towels or body pillows can transform your sleep experience by providing targeted support exactly where needed.

Changing long-established sleep habits certainly requires patience. Still, the benefits of proper sleep posture extend far beyond just your nights—they directly influence how you feel each morning and throughout your day. Persistent morning stiffness often signals the need for sleep posture adjustments rather than representing an inevitable part of ageing.

Your specific health conditions also factor into optimal sleeping arrangements. Whether dealing with scoliosis, herniated disks, or pregnancy-related discomfort, tailored approaches to sleep positioning can make a substantial difference in your pain levels.

Remember that small, consistent changes to your sleep habits can yield significant results over time. Therefore, implementing the recommended positions and support techniques gradually helps train your body toward better alignment. The effort you invest in improving your sleep posture now will reward you with more restful nights and pain-free mornings for years to come.

🔹 Ready to say goodbye to back pain? Consult Dr. Manu Mengi, the Best Doctor for Back Pain in Mohali, for lasting relief. Call +91 87250 11661.

Key Takeaways

Understanding the connection between sleep position and back pain can transform your nights and mornings, leading to better spinal health and reduced discomfort.

• Back sleeping is optimal for spine health – distributes weight evenly and maintains natural spinal curves, but add a pillow under the knees for best results.

• Medium-firm mattresses provide the best pain relief – 75% of orthopedic surgeons recommend firmer surfaces, as they support natural alignment without excessive sinking.

• Side sleeping requires proper pillow placement – place a firm pillow between the knees to maintain spinal alignment and prevent hip rotation.

• Stomach sleeping should be avoided – this position flattens natural spinal curves and forces neck twisting, creating the most pressure on spine muscles.

• Simple props can dramatically improve sleep quality – rolled towels for lumbar support and body pillows for side sleepers provide targeted relief at minimal cost.

Poor sleep posture affects 8 out of 10 people who experience back pain during their lifetime. The good news is that making these evidence-based adjustments to your sleep setup can break the cycle of pain and poor sleep quality, helping you wake up refreshed rather than stiff.

FAQs

Q1. How does sleeping position affect back pain?

A1. Different sleeping positions can either alleviate or exacerbate back pain. Back sleeping is generally considered the best for spine health as it maintains natural spinal curves. Side sleeping with proper pillow support is also beneficial. Stomach sleeping is usually the worst position as it flattens the spine’s natural curve and forces neck twisting.

Q2. What type of mattress is best for reducing back pain?

A2. Medium-firm mattresses are typically recommended for back pain relief. They provide adequate support to maintain proper spinal alignment without being too hard. Memory foam and latex options can be particularly effective as they contour to your body’s natural curves and distribute weight evenly.

Q3. Can sleeping with a partner contribute to back pain?

A3. Yes, sleeping with a partner can potentially lead to back pain if it causes you to adopt poor sleeping postures. Compromising your natural sleeping position to accommodate your partner or using an unsuitable mattress for two people can create compressions or twists in your body, potentially leading to discomfort.

Q4. Are there any props that can help improve sleep posture?

A4. Yes, several props can enhance sleep posture. Placing a pillow between your knees when side sleeping can help maintain spinal alignment. For back sleepers, a pillow under the knees can reduce pressure on the lower back. Lumbar support pillows and body pillows can also provide targeted support and improve overall sleep posture.

Q5. How often should I replace my mattress to prevent back pain?

A5. It’s generally recommended to replace your mattress every 6-8 years. However, if you notice visible indentations deeper than 1.5 inches, experience unexplained morning stiffness or pain, or find you sleep better elsewhere than in your bed, it might be time for a replacement sooner. A worn-out mattress can contribute to poor sleep posture and back pain.

About Best Doctor for Back Pain Treatment in Mohali – Dr. Manu Mengi

Dr. Manu Mengi is a renowned Back Pain Specialist in Mohali, offering advanced and personalised treatment for chronic and acute back pain. With years of experience in orthopedic care, he provides the most effective Lower Back Pain Treatment in Mohali, ensuring patients regain mobility and live pain-free lives. Whether you suffer from posture-related discomfort or severe spinal conditions, Dr. Mengi’s expertise ensures the highest standard of care.


📍 Visit his clinic today or check out his Google My Business profile for patient reviews!

Orthopedic Complications in Diabetic Patients

Diabetic Bone & Joint Problems: Orthopedic Risks & Solutions

Diabetes & bone health concerns will significantly affect more people in the coming years, with projections showing diabetes cases increasing from 285 million in 2010 to a staggering 439 million by 2030. This growing health crisis not only impacts blood sugar management but also creates serious orthopaedic complications that can dramatically reduce your quality of life. If you’re seeking expert care, Dr. Manu Mengi, renowned as the Best Orthopedic Doctor in Mohali, emphasises early intervention for diabetic patients at his Ortho Clinic in Mohali.

If you’re living with diabetes, your risk for developing musculoskeletal disorders increases substantially. Diabetic patients face a seven times higher likelihood of surgical site infections, experience delayed fracture healing, and account for 85% of all non-traumatic amputations. Furthermore, your chances of developing hip fractures increase 1.4-1.8 fold with type 2 diabetes and 6-7 fold with type 1 diabetes. The financial burden is equally concerning—diabetes-related healthcare expenditures reached $376 billion in 2010 and are expected to exceed $490 billion by 2030.

Throughout this article, you’ll discover the complex relationship between diabetes and orthopedic health, common complications like Charcot foot and Dupuytren’s contracture, and essential strategies to protect your musculoskeletal system while managing your diabetes.

Understanding How Diabetes Affects the Musculoskeletal System

The relationship between diabetes and musculoskeletal issues stems from complex biochemical processes that affect your entire body. Diabetes doesn’t just impact your blood sugar—it fundamentally alters how your bones, muscles, joints, and connective tissues develop, maintain, and repair themselves.

Types of Diabetes and their Orthopedic Implications

Type 1 and Type 2 diabetes affect your skeletal system in markedly different ways. With Type 1 diabetes (T1DM), the absolute lack of insulin and low insulin-like growth factor 1 (IGF1) levels suppress the development of bone-forming osteoblasts. This inhibits proper skeletal growth during youth, preventing adequate bone mass accumulation. Consequently, people with T1DM face a staggering 6-7 fold increase in hip fracture risk compared to non-diabetic individuals.

In contrast, Type 2 diabetes (T2DM) presents a paradoxical situation. Despite typically having higher bone mineral density (BMD) than non-diabetics, T2DM patients still experience a 1.4-1.8 fold increased risk of hip fractures. This occurs because T2DM negatively affects bone quality rather than quantity. Advanced stages of T2DM combine multiple detrimental factors—insulinopenia, hyperglycemia, advanced glycation end products (AGEs), chronic inflammation, and microvascular disease—that collectively compromise bone architecture and strength.

Notably, certain musculoskeletal complications appear more frequently in specific diabetes types. For instance, diffuse idiopathic skeletal hyperostosis (DISH) occurs more commonly in Type 2 diabetes, particularly in obese patients, with prevalence rates of 13-49% compared to just 1.6-13% in the general population.

Role of Insulin Resistance in Bone and Joint Health

Insulin resistance—the key pathology underlying Type 2 diabetes—significantly impacts your bone strength. Research shows that greater insulin resistance correlates with lower femoral neck strength relative to load, with every doubling of insulin resistance associated with a 0.34 to 0.40 standard deviation decrease in bone strength indices.

Interestingly, it’s hyperinsulinemia (high insulin levels) rather than hyperglycemia (high blood sugar) that primarily drives this negative effect on bone quality. Although insulin typically increases bone mineral density through skeletal loading effects, insulin resistance prevents this beneficial adaptation. Therefore, despite having a higher body weight that should strengthen bones, people with insulin resistance don’t gain the expected skeletal benefits from their increased mass.

The relationship extends beyond bone density—insulin resistance also impacts joint health. Eight out of ten Type 2 diabetes patients likely experience musculoskeletal complications, with obesity being a common denominator for both conditions.

Impact of Hyperglycemia on Immune and Healing Response

Chronic high blood sugar profoundly disrupts your body’s healing and immune functions through several mechanisms:

  • Impaired inflammation control: Hyperglycemia increases pro-inflammatory cytokines like TNF-α, interleukin-1β, and interleukin-6, creating a state of chronic low-grade inflammation.
  • Compromised immune function: High blood sugar inhibits interleukin-1 release from macrophages, impairs phagocytosis, and diminishes oxygen radical production from neutrophils, collectively weakening your immune response.
  • Delayed tissue repair: Hyperglycemia reduces important cytokine production and decreases new blood vessel formation at fracture sites, slowing healing.

Moreover, hyperglycemia leads to the formation of advanced glycation end products (AGEs) that cross-link with collagen fibres in both trabecular and cortical bone. This makes bones more brittle and deteriorates their post-yield properties without necessarily changing bone mineral density. Additionally, AGEs directly interfere with osteoblast function, inhibiting proper bone formation.

These metabolic disruptions help explain why diabetic patients show higher rates of delayed union and non-union during fracture healing, with healing time potentially prolonged by up to 87%.

Common Orthopedic Complications in Diabetic Patients

Living with diabetes involves managing numerous musculoskeletal complications beyond blood sugar control. Prolonged hyperglycemia damages tissues throughout your body, leading to several distinct orthopedic conditions that can severely impact mobility and quality of life.

Charcot joint and Diabetic Foot Ulcers

Charcot neuroarthropathy, often called Charcot foot, represents one of the most serious diabetes-related orthopedic emergencies. This condition occurs when undetected injuries to foot bones lead to joint deterioration due to nerve damage, a common diabetes complication primarily affecting the feet.

The earliest sign is typically swelling, which can occur without obvious injury. Redness and warmth frequently follow, often mistaken for infection. As Charcot foot progresses, joints collapse and deform, creating a characteristic “rocker-bottom” foot shape.

What makes Charcot foot particularly dangerous is that 50% of patients who develop ulcers face amputation risk, versus only 10% without ulcers. Indeed, 85% of non-traumatic amputations stem from diabetes. Early detection and limiting weight-bearing activities are crucial for slowing progression.

Osteoarthritis and Joint Stiffness

Type 2 diabetes increases osteoarthritis (OA) risk beyond what would be expected from obesity alone. The link stems primarily from hyperglycemia-induced advanced glycation end products (AGEs), which accumulate in cartilage, trigger inflammation, and accelerate joint degradation.

Specifically, AGEs activate chondrocytes and synoviocytes to produce pro-inflammatory mediators. Studies show diabetic OA patients have higher levels of matrix metalloproteinases and experience stronger local inflammation with pronounced synovitis.

Joint pain is typically worse in diabetic patients with OA, especially in knee and hand joints. A recent large cohort study confirmed that increased OA pain is a specific feature of diabetes, not merely a result of increased OA progression or higher BMI.

Frozen Shoulder and Limited Joint Mobility

Frozen shoulder (adhesive capsulitis) occurs seven times more frequently in diabetic patients than in the general population. This painful condition limits shoulder motion and progresses through three distinct phases: freezing (painful with decreasing motion), frozen (less painful but stiffer), and thawing (gradual improvement).

Limited joint mobility syndrome (LJMS), another common complication, initially affects small joints in hands and feet but can eventually impact all joints, including shoulders, hips, and spine. The “prayer sign” and “tabletop sign” are clinical tests strongly supporting diagnosis.

Research using three-dimensional kinematic analysis found diabetic patients show 11-16° decreased glenohumeral external rotation and 10-14° decreased humerothoracic elevation. Further, external rotation with the arm abducted was reduced by 20-22° in diabetic patients compared to controls.

Dupuytren’s Contracture and Hand Deformities

Dupuytren’s contracture creates a progressive deformity where fingers bend toward the palm due to thickening and scarring of connective tissue. Notably, patients with Type 2 diabetes have a 1.641 times higher prevalence of this condition compared to those with Type 1 diabetes.

This difference is likely related to glycosylation—a process where glucose molecules attach to proteins, making collagen sticky and restricting movement. Among diabetic patients, those using insulin show higher Dupuytren’s prevalence than those taking metformin.

DISH and Spinal Complications

Diffuse idiopathic skeletal hyperostosis (DISH) involves abnormal bone growth along the spine’s anterolateral aspect, affecting at least four contiguous vertebrae. This condition occurs disproportionately in diabetic patients, with a 40% prevalence in obese type 2 diabetics compared to only 13% in the general population.

DISH causes spinal stiffness and can lead to unstable spine fractures even with minimal trauma. Meta-analysis confirms a significant association between DISH and carbohydrate metabolism disorders, potentially related to lower serum levels of natural osteogenesis inhibitor Dickkopf-1 (DKK-1).

Bone and Tendon Healing Challenges in Diabetes

Beyond common complications, diabetes creates profound challenges in healing processes that can significantly extend your recovery time following injuries. This section explores how diabetes alters your body’s natural repair mechanisms.

Delayed Bone Healing in Diabetics

Your fracture risk increases markedly with diabetes, 6-7 fold with Type 1 diabetes and 1.4-1.7 fold with Type 2 diabetes. Subsequently, these fractures heal more slowly. Research shows healing time in diabetic patients is prolonged by a staggering 87%, often resulting in prolonged disability and reduced mobility.

The mechanisms behind this delayed healing include insulin insufficiency, hyperglycemia, and oxidative stress—all of which reduce osteoblast differentiation, increase osteoclast activity, and alter chondrocyte apoptosis. Typically, these disruptions interfere with the normal transition from cartilage to bone during the healing process.

Fracture Healing in Diabetes: What Research Shows

Clinical studies reveal diabetic patients face a 3.4-fold higher risk of fracture complications, including delayed union, non-union, and redislocation. To clarify, diabetes damages multiple phases of the healing process. The inflammatory phase becomes dysregulated, decreasing the availability of cytokines and growth factors necessary for repair.

Animal studies demonstrate that diabetic fracture healing shows decreased bone apposition and mineralisation. Likewise, researchers observed diabetic mice exhibit increased callus adiposity and hampered biomechanical properties. First thing to remember is that these changes reflect an altered balance of stem cell differentiation, favouring adipocytes over osteoblasts in the fracture callus.

Tendon Abnormality in Diabetic Patients

As a result of metabolic disturbances, your risk for tendon problems increases threefold with diabetes. Unfortunately, these conditions prove more treatment-resistant than in non-diabetic patients. Common manifestations include:

  • Achilles tendinopathy
  • Rotator cuff syndrome
  • Lateral epicondylitis (tennis elbow)
  • Trigger finger

Approximately 5% of diabetic patients develop tendinopathy annually, with risk increasing for those on insulin and with longer disease duration. Diabetes-induced hyperglycemia increases the expression of inflammatory factors that impair tendon healing through elevated reactive oxygen species and apoptotic cells.

Impact of Glycemic Control on Bone Healing

Important to realise, glycemic control significantly influences healing outcomes. Studies consistently show that longer disease duration and worse glycemic control correlate with higher fracture risks. Up to the present time, research demonstrates elevated haemoglobin A1c levels 3-6 months after rotator cuff repair surgery are directly associated with increased re-tear rates.

Conversely, diabetic patients with effective perioperative glycemic control show re-tear rates comparable to non-diabetic patients, highlighting the critical importance of blood sugar management. Treatment with systemic insulin can reverse impaired fracture healing, suggesting insulin signalling plays a necessary role in repair. Nevertheless, local insulin application to fracture sites shows even more promise by directly stimulating cell proliferation.

Surgical Risks and Outcomes in Diabetic Patients

Undergoing orthopaedic surgery with diabetes presents unique challenges that extend far beyond standard surgical risks. Understanding these factors can help you prepare for procedures and improve your chances of successful outcomes.

Diabetes & Orthopedic Surgery Risks

Orthopedic surgery involving diabetes carries substantial complications across all subspecialties, including foot and ankle, upper extremity, adult reconstructive, paediatrics, spine surgery, and sports medicine. Patients with diabetes utilise approximately 45% more hospital bed days compared to non-diabetic patients. Furthermore, non-cardiac surgeries show significantly higher perioperative mortality rates among diabetic patients. The risk of cardiovascular complications such as coronary artery disease, hypertension, and cerebrovascular accidents increases 100%-300% in patients with diabetes.

Surgical Outcomes in Diabetic Orthopedic Patients

Surgical outcomes differ remarkably between diabetic types. Type 1 diabetes patients experience longer hospital stays and higher costs than those with Type 2 after hip and knee arthroplasty. Both surgical complications (haemorrhage and wound infection) and non-surgical complications (heart attack, pneumonia, urinary infections, and death) occur more frequently in Type 1 diabetic patients. Interestingly, well-controlled diabetic patients without comorbidities demonstrate similar outcomes to non-diabetic patients.

Peripheral Vascular Disease & Orthopedic Surgery

Peripheral vascular disease (PVD) dramatically complicates orthopedic surgery. Macrovascular disease often results in atherosclerosis that impedes wound healing. Once diabetic foot ulcers develop (in 15%-25% of diabetic patients during their lifetime), infection risk rises dramatically. Severe diabetic foot infections requiring transtibial amputation occur in nearly 20% of cases. Atherosclerosis affecting osseous structures can weaken bones, especially among patients with diabetic nephropathy and vitamin D deficiency.

Infection and Implant Failure Risks

Infection rates increase substantially with hyperglycemia. Patients showing serum glucose above 220 mg/dL experienced a 25% overall infection rate. Perioperative glucose exceeding 220 mg/dL increases infection likelihood sevenfold in orthopedic trauma patients. Notably, patients with complicated diabetes (neuropathy, PAD or nephropathy) face seven times higher surgical site infections compared to non-diabetic patients. Hyperglycemia simultaneously increases pulmonary embolism risk by 200% after joint replacement procedures.

Strategies for Prevention and Management

Managing orthopedic complications requires proactive strategies that extend beyond basic diabetes care. Proper interventions can significantly reduce your risk of serious musculoskeletal issues and improve surgical outcomes.

Importance of Glycemic Control Before Surgery

Preoperative glycemic control is essential for minimising surgical complications. Studies show that HbA1c levels above 7.0% are associated with higher rates of surgical site infections in spinal surgery (35.3% compared with 0.0%). Most orthopedic surgeons recommend an HbA1c target below 8% for elective procedures. For trauma patients where surgery cannot be delayed, comanagement with internal medicine can help rapidly reduce blood glucose levels.

Beyond preoperative optimisation, maintaining glycemic control throughout hospitalisation is crucial. Current guidelines recommend pre-prandial glucose levels below 140 mg/dL and random glucose below 180 mg/dL for non-ICU patients. In the ICU setting, serum glucose levels should be maintained below 150 mg/dL.

Physical Therapy and Lifestyle Interventions

Physical therapy plays a vital role in managing diabetic musculoskeletal complications. Recommended exercises include:

  • Strength training to improve muscle function and reduce neuropathic pain
  • Aerobic activity for cardiovascular health and glycemic control
  • Balance and posture training for falls prevention (particularly important as diabetes increases fall risk by 200-300%)
  • Flexibility exercises to improve joint mobility

Regular physical activity reduces diabetes risk by approximately 30%. In fact, brisk walking for at least 2.5 hours weekly is associated with reduced type 2 diabetes risk regardless of body mass index.

Monitoring for Neuropathy and Vascular Issues

Regular foot examinations are crucial since 85% of non-traumatic amputations among diabetic patients begin with chronic foot ulcers. Screening should include thorough visual inspection for calluses, blisters, and redness—all precursors to skin breakdown.

Additionally, vascular assessment should evaluate peripheral artery disease, a component cause in approximately one-third of foot ulcers. Palpate the dorsalis pedis and tibialis posterior arteries, and check capillary refill (refill exceeding 4.5 seconds indicates compromised circulation).

When to consider surgical intervention

Surgical intervention becomes necessary when conservative measures fail or complications threaten limb viability. Prior to orthopedic surgery, vascular assessment is essential—revascularisation surgery should systematically precede orthopedic procedures in cases of critical vascular insufficiency.

For diabetic foot complications, prophylactic surgery to limit ulceration risks should be approached cautiously and only when justified. Acute diabetic foot is considered a medical emergency requiring immediate empiric antibiotics.

Conclusion

Living with diabetes undoubtedly presents significant orthopedic challenges that extend far beyond blood sugar management. Throughout this article, we’ve examined how diabetes fundamentally alters your musculoskeletal system through complex biochemical mechanisms. Certainly, the statistics paint a concerning picture—diabetes increases surgical site infection risk sevenfold, delays fracture healing by up to 87%, and accounts for 85% of all non-traumatic amputations.

Effective management of orthopedic complications requires a comprehensive approach. First and foremost, maintaining tight glycemic control stands as your primary defence against serious complications. Research conclusively demonstrates that well-controlled diabetic patients without comorbidities show surgical outcomes similar to non-diabetic individuals. Additionally, regular physical activity not only improves your overall diabetic control but also specifically strengthens bones and muscles while reducing fall risk.

The relationship between diabetes and orthopedic health highlights the importance of preventive care. Regular screening for neuropathy and vascular issues allows early intervention before complications become severe. Though orthopedic challenges associated with diabetes may seem overwhelming, understanding these risks empowers you to take proactive steps. Remember that early detection, consistent monitoring, and appropriate lifestyle modifications significantly reduce your risk of developing serious musculoskeletal complications that could permanently affect your mobility and quality of life.

FAQs

Q1. What are the most common orthopedic complications associated with diabetes?

A1. Common orthopedic complications in diabetic patients include Charcot foot, diabetic foot ulcers, osteoarthritis, frozen shoulder, Dupuytren’s contracture, and diffuse idiopathic skeletal hyperostosis (DISH). These conditions can significantly impact mobility and quality of life.

Q2. How does diabetes affect bone healing?

A2. Diabetes can delay bone healing by up to 87%. It impairs the inflammatory phase, decreases bone formation, and alters stem cell differentiation in fracture sites. This results in a higher risk of complications such as delayed union, non-union, and redislocation of fractures.

Q3. What are the risks of orthopedic surgery for diabetic patients?

A3. Diabetic patients face increased risks during orthopedic surgery, including higher rates of surgical site infections, longer hospital stays, and greater chances of cardiovascular complications. Well-controlled diabetes, however, can lead to outcomes similar to those of non-diabetic patients.

Q4. How can diabetic patients prevent orthopedic complications?

A4. Prevention strategies include maintaining good glycemic control, engaging in regular physical activity (including strength training and balance exercises), monitoring for neuropathy and vascular issues, and undergoing regular foot examinations to detect early signs of complications.

Q5. When should a diabetic patient consider surgical intervention for orthopedic issues?

A5. Surgical intervention should be considered when conservative measures fail or when complications threaten limb viability. However, it’s crucial to optimise glycemic control before elective procedures and to assess vascular health, as revascularisation may be necessary before orthopedic surgery in some cases.

About the Doctor

Dr. Manu Mengi is a leading Ortho Doctor in Mohali, specialising in diabetic orthopaedic complications at his state-of-the-art Orthopedic Clinics in Mohali. With decades of experience, he has helped countless patients manage conditions like Charcot foot, diabetic fractures, and joint disorders through evidence-based Orthopedic Treatment in Mohali. Recognised as the Best Orthopedician in Mohali, Dr. Mengi combines advanced surgical expertise with personalised rehabilitation programs to restore mobility and quality of life.

The Science Behind PRP Orthopedic Treatment: Your Body’s Hidden Healing Power

Did you know that muscle strain injuries affect 12-16% of athletes, with hamstring strains alone accounting for 29% of all sports-related injuries? While traditional treatments often involve surgery or medication, PRP Orthopedic Treatment offers a cutting-edge alternative that harnesses your body’s natural healing power.

In fact, Platelet-Rich Plasma (PRP) treatment has gained widespread recognition for treating various musculoskeletal conditions without surgery. This innovative therapy shows promising results for osteoarthritis, tendon injuries, ligament damage, and chronic joint pain. By promoting tissue repair and regeneration through your body’s own healing mechanisms, PRP injections can reduce pain and inflammation while supporting cartilage repair.

This comprehensive guide explains how PRP treatment works, what conditions it can address, and why it might be the solution you’ve been searching for to manage your orthopedic concerns.

What Is PRP Treatment? Understanding the Basics

Platelet-rich plasma (PRP) represents a groundbreaking approach in regenerative medicine that harnesses your body’s natural healing capabilities. At its core, PRP therapy involves using concentrated platelets from your own blood to stimulate tissue repair and accelerate healing processes that might otherwise take much longer.

The science of platelet-rich plasma explained

Platelet-rich plasma consists of two primary elements: plasma (the liquid portion of blood) and platelets (specialized blood cells). Though platelets are best known for their clotting abilities, they also contain powerful growth factors that trigger cell reproduction and stimulate tissue regeneration. These microscopic blood components measure approximately 2 μm in diameter and contain more than 30 bioactive proteins that play fundamental roles in tissue healing.

When concentrated and delivered to injured areas, PRP creates a supraphysiological release of growth factors that can “jump-start” healing in chronic injuries and accelerate repair in acute ones. The science behind PRP is based on amplifying the natural healing cascade that occurs when you’re injured. Instead of waiting for your body to gradually send healing factors to damaged tissues, PRP delivers a concentrated dose directly where it’s needed.

Most scientific definitions consider a platelet concentration of 1 million platelets/μL as the working threshold for therapeutic PRP. This represents a significant increase over normal blood, with PRP typically containing five to ten times more platelets than a standard blood sample.

How PRP is prepared from your own blood

The preparation of PRP begins with a simple blood draw, typically collecting 30cc of your blood, which can yield 3-5cc of PRP depending on your baseline platelet count. After collection, your blood is mixed with an anticoagulant—most commonly acid citrate dextrose-A (ACD-A)—to prevent premature platelet activation.

The preparation process follows these steps:


      1. Initial centrifugation: Your blood sample is placed in a centrifuge that spins at carefully controlled speeds. This first spin (typically 100-300g for 5-10 minutes) separates red blood cells from plasma containing platelets.

      1. Plasma separation: After the first spin, the plasma and buffy coat (containing white blood cells) are transferred to another sterile tube.

      1. Second centrifugation: This spin (typically 400-750g for 10-17 minutes) concentrates the platelets into a small volume of plasma.

      1. Final preparation: The platelet-poor plasma is removed, leaving behind a concentrated platelet solution that’s ready for injection.

    Throughout this process, maintaining proper temperature and handling is crucial for preserving platelet viability and preventing premature activation. Additionally, the entire procedure typically takes less than 30 minutes, allowing for same-day treatment.

    Key components that make PRP effective

    The healing power of PRP comes from its rich concentration of biologically active molecules. Seven fundamental protein growth factors actively secreted by platelets initiate all wound healing processes. The most significant components include:

    Platelets release these growth factors within 10 minutes of activation, with more than 95% of the pre-synthesized growth factors secreted within one hour. Moreover, PRP contains three important proteins that act as cell adhesion molecules: fibrin, fibronectin, and vitronectin.

    Besides platelets, PRP preparations may contain varying amounts of white blood cells, depending on the preparation method. These leukocytes can influence the healing process through immune and host-defense mechanisms, particularly in chronic tissue conditions.

    The main advantage of PRP lies in its autologous nature—it comes from your own body, eliminating concerns about disease transmission or immune reactions. Furthermore, unlike corticosteroid injections, PRP has no known adverse effects since it’s derived from your own blood.

    Although different commercial systems produce varying platelet concentrations, the fundamental mechanism remains the same: PRP delivers a concentrated dose of your body’s own healing factors precisely where they’re needed to accelerate recovery and reduce pain.

    How PRP Activates Your Body’s Natural Healing Process

    The magic of PRP Orthopedic Treatment lies in how it triggers and enhances your body’s inherent healing mechanisms. When platelets are activated at an injury site, they release a powerful cocktail of bioactive molecules that orchestrate tissue repair with remarkable precision.

    Growth factors and their regenerative functions

    The concentrated platelets in PRP release multiple growth factors that act as cellular messengers, directing various aspects of the healing process. These biological powerhouses include:


        • Platelet-derived growth factor (PDGF): Stimulates cell proliferation and migration, particularly of fibroblasts, which produce collagen. PDGF also promotes angiogenesis (new blood vessel formation) to ensure injured tissue receives adequate blood supply.

        • Transforming growth factor-beta (TGF-β): Acts as a potent immunomodulator that regulates inflammation while stimulating the differentiation of fibroblasts into myofibroblasts—crucial cells for wound contraction and tissue remodelling.

        • Vascular endothelial growth factor (VEGF): Drives the formation of new blood vessels, delivering vital oxygen and nutrients to healing tissues. Studies show VEGF significantly promotes angiogenesis in wound tissue.

        • Epidermal growth factor (EGF): Accelerates re-epithelialisation by enhancing the proliferation and migration of epidermal stem cells, which is essential for skin regeneration.

        • Insulin-like growth factor (IGF): Stimulates tenocyte proliferation, increases collagen production, and promotes differentiation of cells essential for tendon healing.

      Each growth factor performs specific functions, yet they work synergistically to create an optimal healing environment. Research indicates PRP contains a sevenfold increase in TGF-β, a thirtyfold increase in PDGF, and a tenfold increase in EGF compared to normal blood concentrations.

      The inflammatory response and tissue repair

      Contrary to common belief, inflammation is an essential first step in healing. PRP expertly modulates this process rather than simply suppressing it.

      Initially, PRP influences immune cells—particularly macrophages—to assume an anti-inflammatory (M2) phenotype associated with tissue repair rather than prolonged inflammation. This strategic polarization creates an environment that favors regeneration over chronic inflammation.

      Simultaneously, PRP decreases expression of pro-inflammatory cytokines like interleukin-17A (IL-17A) and interleukin-1β (IL-1β), helping regulate the inflammatory response. This dual action—promoting necessary inflammatory signals while preventing excessive inflammation—creates ideal conditions for tissue repair.

      Additionally, PRP releases antibacterial substances that reduce local inflammation and prevent wound infection. This protective function is especially valuable in orthopedic applications where infection can significantly compromise healing outcomes.

      Cellular communication in healing

      PRP establishes a sophisticated communication network between different cell types involved in tissue repair. After injection, platelets activate and release their growth factors within 10 minutes, with over 95% of pre-synthesized growth factors secreted within one hour.

      These bioactive molecules serve as signaling messengers that coordinate cellular responses:

      First, they recruit stem cells and fibroblasts to the injury site. Subsequently, they stimulate these cells to proliferate and differentiate into the specific cell types needed for repair. Studies show that low concentrations of PRP (2.5% to 10%) are optimal for promoting cell proliferation.

      For bone and cartilage injuries, PRP upregulates VEGF and PDGF expression, stimulating bone marrow stem cells to differentiate into bone. In tendon injuries, growth factors like IGF-1 and PDGF enhance tenocyte proliferation and increase collagen production.

      The coordinated release of these growth factors creates an orchestrated response among different cell types—preventing excessive scarring while promoting effective regeneration of damaged tissue. This harmonious cellular communication explains why PRP injection is showing promising results for knee osteoarthritis, tendon injuries, and ligament damage.

      Common Orthopedic Conditions Treated with PRP

      PRP Orthopedic Treatment has emerged as a promising option for numerous musculoskeletal conditions, offering a regenerative approach where conventional therapies often fall short. First and foremost, its growing popularity stems from studies showing effectiveness across specific orthopedic conditions.

      PRP for knee osteoarthritis

      Knee osteoarthritis patients often experience remarkable improvements with PRP therapy. Recent research demonstrates significant reductions in pain scores measured by WOMAC pain index and VAS (Visual Analog Scale), with statistical improvements recorded at one, three, and six months after treatment. Studies specifically show that PRP injections achieve better long-term outcomes than corticosteroid injections for symptomatic knee osteoarthritis, with three PRP injections proving more effective than a single injection.

      Indeed, clinical data reveals PRP’s effectiveness in mild to moderate knee osteoarthritis, with benefits lasting up to two years in some cases. The treatment works by influencing the expression of pain mediators like prostaglandin E2 and stimulating the synthesis of cartilage matrix through growth factors that promote chondrocyte growth.

      Treating tendon injuries with PRP therapy

      Tendon healing responds particularly well to PRP intervention. Research confirms PRP’s effectiveness for chronic tendon injuries, with tennis elbow (lateral epicondylitis) showing consistently positive outcomes. Additionally, promising results have been documented for chronic Achilles tendinitis and patellar tendinopathy (jumper’s knee).

      Notably, PRP enhances collagen synthesis, vital for maintaining tendon strength and integrity. The concentrated growth factors stimulate collagen production, promoting structural restoration of damaged tendons. According to studies, patients with acute muscle strains of grade I and II demonstrated excellent recovery with a single PRP injection and supervised strengthening.

      PRP for ligament repair and sports injuries

      Athletes frequently benefit from PRP’s regenerative properties. Research indicates that sports injuries not responding to conservative management often show optimal effects with PRP treatment. Consequently, athletes requiring a single injection for acute injuries of lower grade returned to sports activity earlier than those needing multiple injections for chronic conditions.

      PRP has shown promise for common sports injuries including pulled hamstring muscles, knee sprains, and other muscle strains. Nevertheless, research on anterior cruciate ligament (ACL) repair remains inconclusive, with current evidence showing limited benefits for surgical augmentation.

      PRP applications for rotator cuff injuries

      Rotator cuff treatments with PRP have demonstrated measurable improvements. Ultrasound-guided PRP injections significantly improved pain (measured by Visual Analog Scale), shoulder range of motion, and function (assessed by DASH score) compared to physical therapy in patients with chronic partial supraspinatus tears.

      Research shows PRP reduces the chance of progression from microtears to full tears by strengthening the rotator cuff and reducing fatty infiltration. Regardless, studies indicate PRP works best for mild to moderate rotator cuff tendinopathies or early partial tears, with more variable outcomes for complete tears.

      The PRP Procedure: What to Expect During Treatment

      Understanding the PRP procedure from start to finish helps you prepare properly for this regenerative treatment. When scheduled for PRP orthopedic treatment, knowing what happens before, during, and after your appointment can significantly reduce anxiety and improve your experience.

      Pre-treatment preparation

      Proper preparation begins 7-10 days before your PRP injection. First, stop taking NSAIDs (ibuprofen, aspirin, naproxen) as these medications interfere with the inflammatory response necessary for healing. Similarly, discontinue nutritional supplements including Vitamin E, fish oil, flax oil, and turmeric at least one week prior to treatment.

      If you take daily aspirin for a heart condition, consult your prescribing physician about temporarily pausing this medication. Likewise, avoid corticosteroid injections at the treatment site for at least two months beforehand, as these can compromise PRP effectiveness.

      Hydration plays a crucial role in preparation—drink at least four 8-ounce glasses of water the day before and three glasses within three hours of your appointment. Additionally, eat a nutritious meal before arriving, as this helps prevent lightheadedness during the procedure.

      The blood collection and processing steps

      During your appointment, a medical professional will draw approximately 30-60mL (2-4 tablespoons) of your blood using a butterfly needle with pre-loaded anti-coagulant. Afterward, this sample is placed into a centrifuge—a device that spins rapidly to separate blood components based on their density.

      This centrifugation process typically takes 10-15 minutes and separates red blood cells from platelets and plasma. The concentrated platelets are then collected and prepared for injection, with concentration levels reaching 2-8 times normal levels depending on the specific protocol used.

      Injection techniques for different conditions

      Before injection, your physician generally numbs the area with local anesthetic. Throughout the procedure, ultrasound or fluoroscopy imaging guides the injection to ensure precise placement at the injury site. This imaging-guided technique is particularly important for joint injections and tendon repairs.

      During injection, you’ll likely experience moderate pain and pressure sensations that peak about 5 minutes post-injection before gradually subsiding over 10-15 minutes. This discomfort primarily results from the fluid volume creating pressure in tissues unaccustomed to it.

      The entire in-office procedure typically takes under 90 minutes from arrival to completion. Following injection, your doctor may recommend a brief rest period before allowing you to return home. Many physicians also suggest physical therapy afterward to optimize healing outcomes.

      Recovery and Results: Timeline After PRP Injection

      After undergoing PRP Orthopedic Treatment, the recovery phase plays a crucial role in determining your overall results. Understanding the timeline for healing and improvement helps set realistic expectations for your journey back to full function.

      Immediate post-injection care

      Once your PRP injection is complete, proper aftercare becomes essential for optimal results. For the first 24 hours, avoid touching, pressing, rubbing, or manipulating the treated area. Apply cold packs for 20 minutes every 2 hours on treatment day, then every 3-4 hours the following day.

      Most importantly, you must avoid anti-inflammatory medications. Do NOT take aspirin, ibuprofen, naproxen, or any other NSAIDs for at least 4 weeks after your procedure. These medications interfere with the healing process that PRP initiates. If you experience discomfort, acetaminophen (Tylenol) is generally permitted.

      Additional immediate care guidelines include:

          • No showering for the first 12 hours

          • Avoiding lotions, creams or makeup on the treated area for 24 hours

          • Minimizing alcohol, caffeine and cigarette consumption

          • Staying hydrated to promote healing

        PRP injection recovery time by condition

        Recovery timelines vary significantly based on what you’re treating. For moderate to severe musculoskeletal injuries, expect a 6-12 month recovery period. Mild to moderate injuries typically require 4-8 months, yet joint injections generally cause soreness for just 3-7 days followed by gradual improvement over several weeks.

        Tendon treatments often involve longer soreness periods with full effects taking 3-4 months to manifest. Interestingly, ligament treatments may create a 1-2 week “honeymoon period” where initial swelling provides better stability before temporary regression occurs.

        When to expect improvement

        For most patients, PRP benefits become noticeable after several weeks for joint injections and up to six months for other applications. Initially, you may experience bruising, redness, itching, soreness, and swelling lasting 3-10 days.

        Most people report symptom improvement within several weeks, though the complete effects may take up to 6 months to fully develop. Curiously, immediately after treatment, many patients notice minimal changes as PRP works by promoting healing rather than providing immediate relief.

        Potential need for multiple treatments

        Depending on your condition, you might require several PRP sessions for optimal results. Studies comparing single versus multiple injections found that a single injection was equally effective for pain improvement within a six-month interval, yet multiple injections proved more effective for functional improvement.

        The administration pattern varies widely across clinical practices, with some conditions benefiting from a series of three treatments spaced 4-6 weeks apart. Overall, research indicates PRP success rates of approximately 80% for mild to moderate knee arthritis, with results typically lasting 1-2 years. Similarly, about 80% of patients with partial tendon and ligament tears report long-term positive outcomes.

        Conclusion

        PRP Orthopedic Treatment stands as a powerful alternative to traditional surgical interventions, offering hope through your body’s natural healing abilities. Research consistently shows positive outcomes across various conditions, particularly for knee osteoarthritis, tendon injuries, and sports-related trauma.

        Though recovery timelines differ based on specific conditions, most patients notice significant improvements within several weeks after treatment. Your commitment to proper aftercare plays a vital role in achieving optimal results, especially during the first few months post-treatment.

        The science behind PRP continues to evolve, yet current evidence strongly supports its use for mild to moderate orthopedic conditions. Success rates reaching 80% for conditions like knee arthritis and partial tendon tears demonstrate why many patients choose this regenerative approach over conventional treatments.

        Before considering surgery for your orthopaedic condition, discuss PRP therapy with your healthcare provider like Dr. Manu Mengi, recognised as one of the Best Orthopedician in Mohali at leading Orthopedic Clinics in Mohali.

        FAQs

        Q1. How does PRP treatment work in orthopedics?

        A1. PRP treatment utilises concentrated platelets from your own blood to stimulate tissue repair and accelerate healing. When injected into injured areas, it releases growth factors that promote cell reproduction, reduces inflammation, and enhance the body’s natural healing processes for various orthopaedic conditions.

        Q2. What orthopedic conditions can be treated with PRP?

        A2. PRP therapy has shown effectiveness in treating various orthopedic conditions, including knee osteoarthritis, tendon injuries (such as tennis elbow and Achilles tendinitis), ligament damage, rotator cuff injuries, and certain sports-related injuries like muscle strains and sprains.

        Q3. How long does it take to see results from PRP treatment?

        A3. While individual experiences may vary, most patients begin to notice improvements within several weeks after treatment. However, the full effects of PRP therapy can take up to 6 months to fully develop, depending on the specific condition being treated.

        Q4. Is PRP treatment painful, and what is the recovery process like?

        A4. During the injection, patients may experience moderate pain and pressure that typically subsides within 10-15 minutes. Post-treatment, some soreness and swelling may occur for 3-10 days. Recovery time varies based on the condition, but most patients can resume normal activities within a few days to weeks, following their doctor’s guidelines.

        Q5. How many PRP treatments are typically needed for optimal results?

        A5. The number of treatments required depends on the specific condition and its severity. While some patients may see significant improvement after a single injection, others may benefit from a series of treatments. For example, some practices recommend three treatments spaced 4-6 weeks apart for certain conditions to achieve optimal results.

        About the Author:

        Dr. Manu Mengi is a renowned Ortho Doctor in Mohali specialising in advanced Orthopedic Treatment in Mohali including PRP therapy at his Ortho Clinic in Mohali.

        Strengthen Your Bones: A Physiotherapist’s Guide to Managing Osteoporosis

        The numbers are startling – 55% of Americans over age 50 have osteoporosis or low bone mass. This “silent disease” affects about 10 million people in the United States, while 34 million more face an increased risk. Osteoporosis can substantially affect your quality of life, but physiotherapy management provides effective solutions to maintain bone health and prevent fractures. If you’re looking for the Best Physiotherapist in Mohali you’re in the right place to learn how expert care can make a difference.

        Your condition improves with physiotherapy’s targeted exercise programs that boost bone density and lower fall risk. You can build strength, improve balance, and stay mobile through resistance training, weight-bearing exercises, and specialised techniques. Physiotherapy can help whether you received your diagnosis recently or want to prevent future complications. Better bone health starts with understanding how physiotherapy works for you.

        Understanding Osteoporosis: A Physiotherapist’s Perspective

        Bone health gets worse as you age, especially after 35 when bone breakdown happens faster than your body can build new bone. You can better understand osteoporosis and treatment options by learning about it from a physiotherapist’s viewpoint.

        What happens to your bones in osteoporosis

        Your bones constantly rebuild throughout life by replacing old tissue with new. This delicate balance changes with age. Bone mineral density starts declining steadily after age 30. Osteoporosis develops when bone breakdown happens faster than new bone forms, which makes the bone tissue structure weaker.

        Different types of bones show different effects. The inner mesh-like structure, called trabecular bone, shows the first signs of osteoporosis. People under 65 lose mostly trabecular bone even though it makes up just 20% of their skeleton. The dense outer layer, known as cortical bone, becomes more porous as you get older. This affects areas like your hip and femur the most.

        Weak bones break more easily. About 1.5 million fractures happen each year because of thin bones. Spine compression fractures happen most often, but doctors usually find them by accident during other scans.

        How physiotherapy addresses bone loss

        Physiotherapists take a complete approach to managing osteoporosis through targeted exercises. They create custom programs that include:

        • Activities that put weight on your bones to help them grow
        • Strength training to build muscles and make bones denser
        • Exercises to help you balance better
        • Training to protect your spine by improving posture

        Exercise can increase bone density by 1% to 3%. Your bones need time to respond – they take three to four months to complete one rebuilding cycle.

        The importance of early intervention

        Finding osteoporosis early matters because it develops without obvious signs. Doctors miss chances to treat 84% of osteoporotic fractures. Starting physiotherapy early can slow down bone loss and lower your risk of breaks.

        Physiotherapists look at several things when they first see you:

        • Your health history and family background
        • Medicines you take
        • How much you exercise
        • What you eat
        • Your hormone levels

        This full picture helps them create specific programs to improve your bone health. They focus on exercises that build bone or slow down bone loss in areas that break easily, like your hip, spine, shoulder, and arms.

        The best results come from combining resistance training with weight-bearing exercises. Your treatment plan changes based on:

        • How fit you are now
        • Your overall health
        • What you do each day
        • What you want to achieve

        Regular physiotherapy sessions can help you balance better, lower your risk of falls, build stronger muscles, and improve your posture. Starting early helps prevent your bones from getting weaker and lets you stay independent longer.

        Getting Started: Your First Physiotherapy Session for Osteoporosis

        Your bone health improvement plan starts with a detailed evaluation of physiotherapy. Before booking your first visit, check with your healthcare provider about specific tests you might need, especially with advanced osteoporosis. If you’re in Mohali, Chandigarh or nearby, consider visiting the Best Physiotherapist Clinic in Mohali for a comprehensive assessment.

        What to expect during assessment

        The original physiotherapy session gives a full picture of your condition. Your physiotherapist will get into several aspects of your health:

        • A detailed medical history review that includes past fractures and your family’s history of osteoporosis
        • A look at your height, weight, posture, balance, and walking pattern
        • Your current fitness level and daily activities
        • Your diet, exercise habits, and lifestyle factors

        Creating your customized treatment plan

        Your physiotherapist develops a unique treatment program based on these key factors:

        • Your specific injury or health condition
        • Current wellness status and pre-existing conditions
        • Daily activity requirements
        • Personal goals for physical therapy

        The treatment plan combines therapeutic approaches of all types:

        • Resistance training to build bone strength
        • Weight-bearing exercises for spine, hips, and legs
        • Balance training activities that improve stability
        • Body mechanics education for everyday movements
        • Pain management techniques

        Setting realistic goals for bone health

        Your physiotherapist will help set achievable goals that line up with your fitness level and lifestyle. The main goals focus on:

        1. Learning and using fracture prevention strategies
        2. Safe postures and movements for daily activities
        3. Fall prevention techniques
        4. Regular bone-safe resistance and flexibility exercises

        Your physiotherapist adjusts exercises based on your progress. The difficulty and repetition of exercises may increase as you get stronger. Your therapist makes sure you do all exercises correctly to maximize benefits and prevent injury.

        Regular check-ups help track your progress and adjust your treatment plan. Your physiotherapist guides you on proper form and technique to help you get the most from each session. Note that consistent attendance and following your prescribed exercise routine leads to optimal results.

        Essential Strength Training Exercises for Osteoporosis

        Strength training is the life-blood of osteoporosis management. Research shows that consistent resistance exercises can increase bone mineral density by up to 1.82% in the lumbar spine.

        Safe resistance training techniques

        You should start with light weights and proper form to get optimal results. The best approach is to begin with 2 sets of 10-12 repetitions at 50% of your maximum capacity. You can then work your way up to 85% as your strength improves. Your movements must stay controlled, and you should avoid exercises that involve bending forward or twisting motions.

        Key safety principles include:

        • Working with a qualified physiotherapist
        • Focusing on proper breathing techniques
        • Maintaining good posture throughout exercises
        • Stopping immediately if you experience pain

        Progressive loading principles for bone stimulation

        Progressive loading gets more and thus encourages more bone formation through gradually increasing resistance. Research indicates that high-intensity loading forces (70%-90% of maximum capacity) work best to increase bone density. You should reach this intensity only through careful progression.

        The optimal training schedule consists of:

        • 3 sessions per week with rest days between workouts
        • 20-30 minutes per session focusing on major muscle groups
        • 8-12 repetitions per exercise set
        • 2-3 sets per exercise with 1-3 minutes rest between sets

        Upper body exercises that protect the spine

        Your upper body strength training needs special attention to spine protection. Research demonstrates that backward-leaning exercises reduce stress on the front of the spine. You should focus on exercises that strengthen the erector spinae muscles that run along your spine and support proper posture.

        For spine safety, avoid:

        • Forward bending movements
        • Sudden twisting motions
        • Heavy overhead lifting
        • Exercises that compress vertebrae

        Lower body exercises for hip and femur strength

        We focused primarily on the hip and femur – areas commonly affected by osteoporosis. Studies show that functional exercises like squats and lunges boost bone mineral density in these regions.

        Research confirms that weight-bearing activities generating forces around 4 times body weight provide strong osteogenic stimulation. You should incorporate exercises that:

        • Target major leg muscles
        • Challenge balance safely
        • Improve functional movement patterns
        • Strengthen hip stabilizers

        It’s worth mentioning that muscle strength improvements directly influence bone health. As muscles get stronger, they pull harder on bones and stimulate bone formation. So, a well-laid-out strength training program should progressively challenge both muscular and skeletal systems while keeping safety as the top priority.

        Balance & Fall Prevention: Critical Components of Osteoporosis Management

        Falls create a serious risk if you have osteoporosis. Research shows that one-third of people over 65 fall each year. Hip fractures result from 90% of these falls, making them the sixth leading cause of death among those aged 65 and above.

        Assessing your fall risk

        Your personal fall risk depends on both internal and external factors. Internal factors include:

        • Balance and mobility issues
        • Muscle weakness
        • Vision problems
        • Chronic health conditions
        • Medications that cause dizziness

        Altered balance remains the biggest contributor to falls in older adults. Your physiotherapist might use the Fall Risk Questionnaire (FRQ) to verify if you’re at high risk of falling.

        Daily balance exercises you can do at home

        Balance training is a vital part of preventing falls. Studies show that exercise programs can reduce fall incidents by up to 50%. The largest longitudinal study over 12 months showed notable improvements through these exercises:

        • Walking in tandem position (one foot directly in front of the other)
        • Practicing heel-to-toe walking
        • Standing on one leg with gradual time increases
        • Side-stepping exercises
        • Combined arm and leg movements while walking

        These exercises work best when done at least twice weekly. Yoga classes could help too – research confirms they improve balance and coordination.

        Environmental modifications to prevent falls

        Most falls happen inside homes, so environmental adjustments make a big difference. Research suggests these key modifications:

        Indoor Safety Measures:

        • Install grab bars near toilets, tubs, and showers
        • Secure all carpets and rugs with non-skid backing
        • Maintain well-lit stairways with handrails on both sides
        • Remove clutter, loose wires, and trailing cords
        • Use non-slip mats in bathrooms and kitchen areas

        Outdoor Precautions:

        • Ensure proper lighting on walkways and entrances
        • Keep paths clear of leaves, snow, and debris
        • Use salt or kitty litter on slippery surfaces
        • Wear appropriate footwear with non-slip soles

        Home safety changes combined with exercise programs reduce fall risk effectively. Research shows that systematic interventions can prevent about 15% of all falls.

        These additional safety strategies can help protect you:

        • Keep frequently used items within easy reach
        • Use cordless phones or cell phones to access emergency services
        • Consider wearing hip protectors
        • Install motion-sensor lights in dark areas
        • Schedule regular vision and hearing checkups

        Balance issues often worsen when taking three or more prescriptions. A medication review with your healthcare provider helps create a complete fall prevention strategy. Staying alert about fall prevention helps maintain your independence and quality of life while managing osteoporosis effectively.

        Pain Management and Mobility Techniques for Osteoporosis Patients

        Pain from fractures and related complications needs careful management, even though osteoporosis itself might not cause discomfort. Your quality of life depends on proper pain control techniques and mobility exercises.

        Managing acute pain from fractures

        Back pain from spinal compression fractures ranks among the most common painful complications. The pain becomes intense when you stand or walk. These fractures usually heal in 6-8 weeks with proper care and rehabilitation. Your physiotherapist might recommend these options to relieve pain quickly:

        • Non-steroidal anti-inflammatory drugs (NSAIDs) to control short-term pain
        • Temporary bracing to support healing bones
        • Modified movement patterns to reduce discomfort

        Studies show NSAIDs work better than placebo treatments to reduce pain during activity. Your body often responds to fractures with muscle spasms to protect affected joints.

        Gentle mobility exercises for stiff joints

        Physical activity is a vital part of recovery, even when you’re in pain. Staying still can make both discomfort and bone health worse. Your physical therapist will create an exercise plan based on:

        • Current pain levels
        • Bone density measurements
        • Overall fitness assessment
        • Risk factors for future fractures

        Simple movements help maintain joint flexibility safely. Indoor walking provides good weight-bearing exercise with minimal fracture risk. You can add more challenging activities under professional supervision as you get stronger.

        When to use heat vs. cold therapy

        Temperature therapy helps manage pain effectively. Cold therapy works best for:

        Acute Injuries (First 72 hours):

        • Reducing inflammation and swelling
        • Numbing acute pain
        • Limiting bruising after falls or impacts

        Heat therapy proves most helpful for:

        Chronic Conditions:

        • Relaxing tight muscles
        • Improving blood flow to stiff joints
        • Enhancing tissue flexibility

        Heat should be applied for 15-20 minutes on surface areas, up to 30 minutes for deeper tissues like hips. All the same, you should be careful with heat if you have:

        • Active inflammation
        • Open wounds
        • Circulatory problems
        • Diabetes
        • Dermatitis

        The best results come from combining the right temperature therapy with gentle movement under your physical therapist’s guidance. Regular updates about your pain levels and treatment response help your therapist adjust the plan to support healing and comfort.

        Conclusion

        Physiotherapy provides great tools that help you stay independent while managing osteoporosis. Targeted strength training, balance exercises, and proper pain management techniques can reduce your risk of fractures by a lot and build stronger bones.

        Success with osteoporosis management needs consistency and proper guidance. Your physiotherapist becomes a trusted partner who creates customised exercise programs that match your needs and abilities. Bone density improvements need time, but the benefits of increased strength, better balance, and improved mobility make it worth the effort.

        Take the first step to better bone health by using these proven strategies. Physiotherapy gives you the structure and support you need to keep your bones strong and life active, whether you have a new diagnosis or want to prevent future complications. If you’re in Mohali, Chandigarh or nearby, consult Dr. Aayushi, the Best Physiotherapist in Mohali, at the Best Physio Clinic in Mohali for expert care tailored to your needs.


        FAQs

        Q1. What are the most effective exercises for strengthening bones in osteoporosis?

        A1. Weight-bearing exercises like brisk walking, jogging, and dancing, as well as resistance training using weights or elastic bands, are highly effective for strengthening bones. These activities stimulate bone formation and help maintain bone density.

        Q2. How can physiotherapy help manage osteoporosis?

        A2. Physiotherapy plays a crucial role in managing osteoporosis by providing customised exercise programs that improve bone density, enhance balance, and reduce fall risk. A physiotherapist can guide you through safe resistance training, weight-bearing exercises, and specialised techniques to build strength and maintain mobility.

        Q3. Is it possible to reverse osteoporosis through physical therapy?

        A3. While physiotherapy cannot completely reverse osteoporosis, it can significantly slow down bone loss and reduce fracture risk. Consistent participation in a tailored physiotherapy program can lead to modest increases in bone mineral density, typically ranging between 1% and 3%.

        Q4. What should I expect during my first physiotherapy session for osteoporosis?

        A4. Your first session will involve a comprehensive assessment of your medical history, current fitness level, and daily activities. The physiotherapist will evaluate your posture, balance, and walking pattern. Based on this evaluation, they will create a personalised treatment plan tailored to your specific needs and goals.

        Q5. How can I prevent falls if I have osteoporosis?

        A5. Fall prevention is crucial for osteoporosis management. Incorporate daily balance exercises like tandem walking and standing on one leg. Make environmental modifications such as installing grab bars, securing rugs, and improving lighting. Regular vision and hearing check-ups, along with medication reviews, are also important for comprehensive fall prevention.


        By visiting the Best Physiotherapist Clinic in Mohali and consulting Dr. Aayushi, you can take proactive steps toward managing osteoporosis effectively. Whether you need Physiotherapy in Mohali or expert guidance on bone health, professional care is within reach.